AI Jewelry Photography Tutorial: One Phone Photo to Amazon, Shopify and Etsy Listings
An AI jewelry photography tutorial: one phone photo becomes a hero shot, an on-model image, an infographic and a video, ready for Amazon, Shopify and Etsy.
 Daria BazankovaPublished 19 Aug 20268 min read
Key takeaways
- The input is one unedited phone photo of an emerald and diamond pendant lying on a stone slab. Amplyar accepts up to three angles per product.
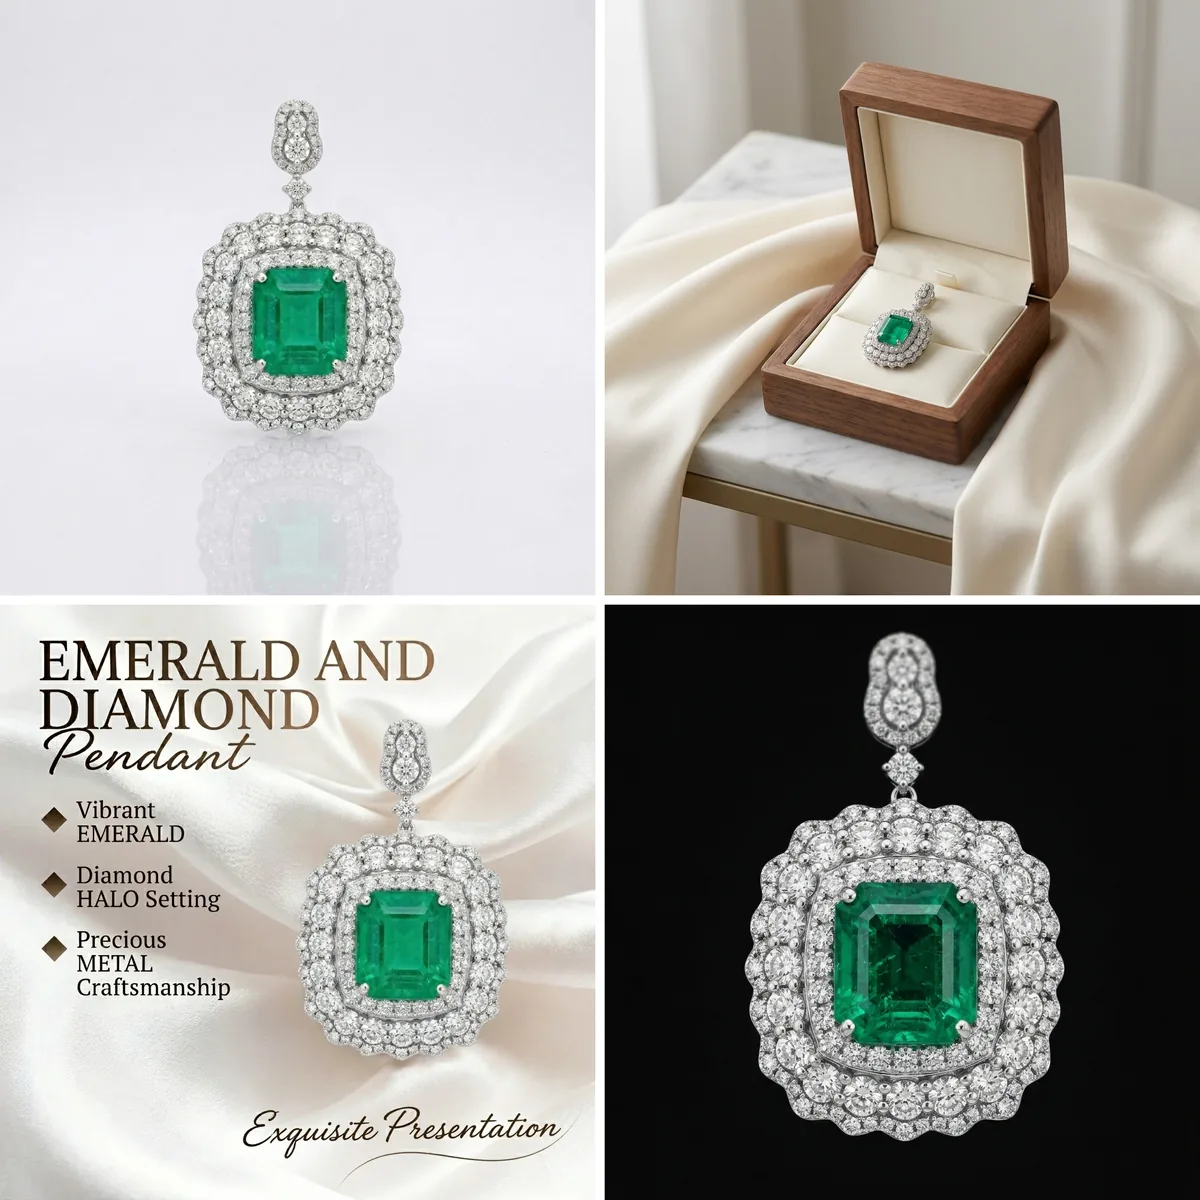
- The recording runs 104 seconds and ends with six assets: a plain-background hero, a close-up, an on-model shot, a lifestyle scene, an infographic and a six-second video.
- The buttons print their prices: 2 credits per still, 1 per edit, 60 for a six-second video. The counter falls from 374 to 300 across the run.
- On-model shots come from a model carousel and a pose grid. The recording uses the model named Maya and the Neckline Close-up pose.
The photo this AI jewelry photography tutorial starts with is one most jewelry sellers already have. It was taken to record which SKU is which, not to sell anything: the pendant lies face up on a rough stone slab, the daylight is uneven, the grain is visible, and the emerald reads muddy rather than green.
That photo is the only input for everything below. We recorded a 104-second screen capture of one emerald and diamond pendant going through Amplyar from upload to finished assets, and this article writes that recording down step by step. Every credit figure quoted here is the number printed on the button that was clicked, or the balance shown in the top right of the screen.
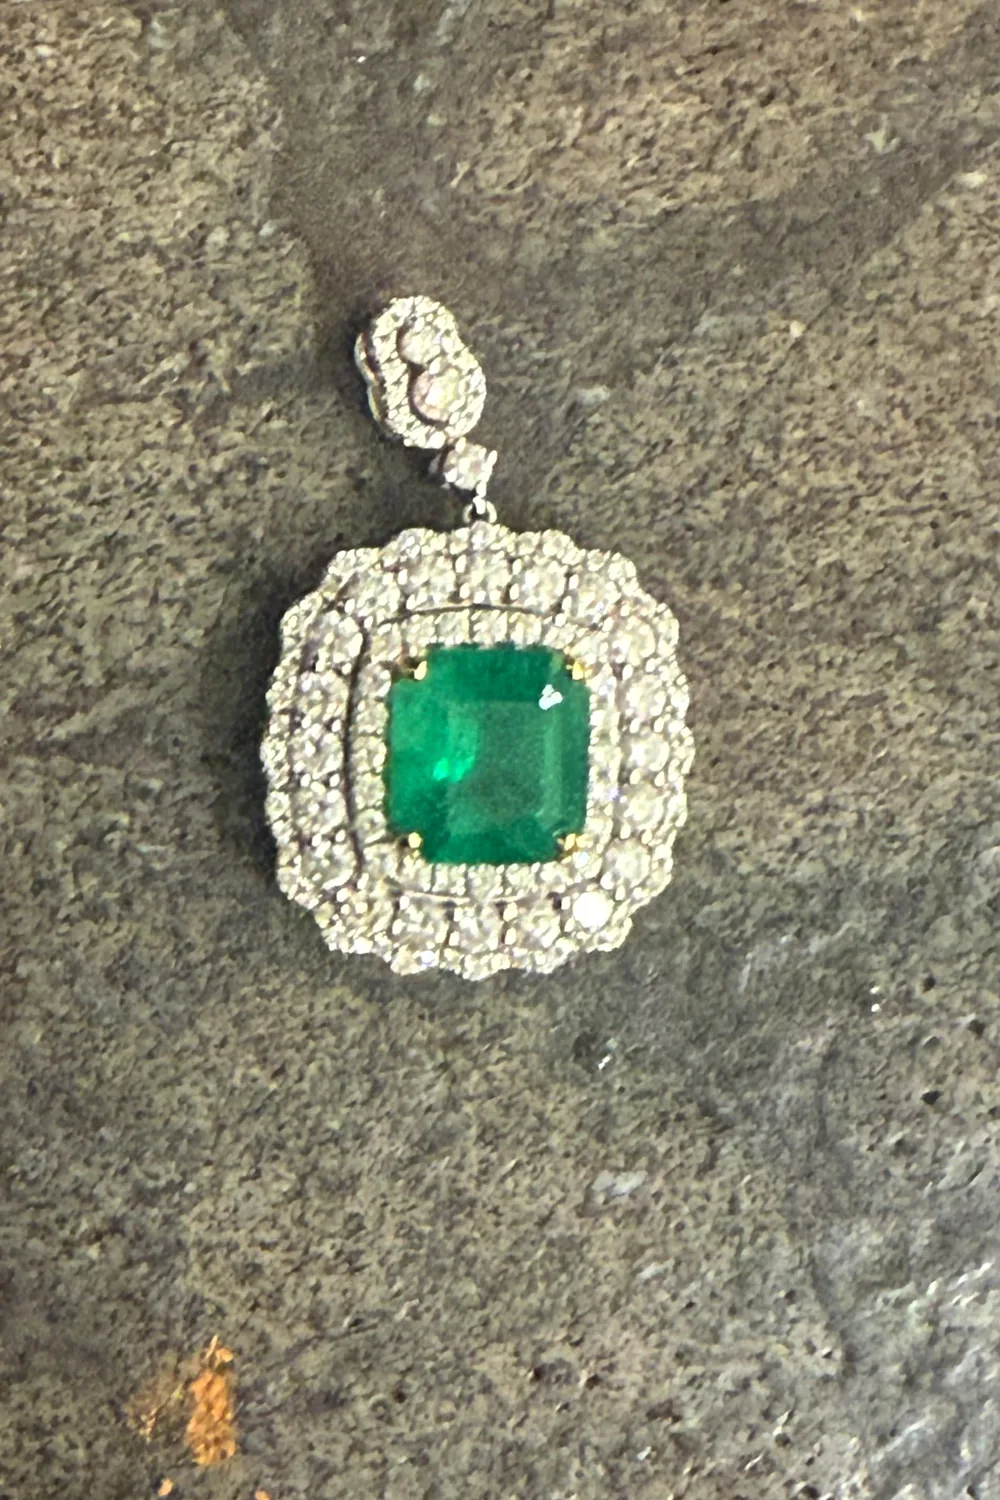
Everything below comes out of that one frame. If your own reference shots are about this good, they will do.
What this AI jewelry photography tutorial covers in 104 seconds
The recording runs at the speed the work happens, including the seconds spent scrolling menus.
Five things happen in order: the photo goes in, a scene type is chosen, the pendant goes onto a model, one result is edited with a sentence, and one still becomes a video. The sections below add the detail the recording moves past too fast to read.
Step 1: the only input this AI jewelry photography tutorial needs
The first panel takes three inputs.
The photo slot accepts up to three shots from different angles, and the recording uses one. There is no lighting or background requirement, but the piece has to be fully in frame and sharp enough that the setting is legible. If the diamonds around the halo are a grey blur in the original, they stay a blur, because that detail was never recorded. If you would rather fix the source photo first, how to photograph jewelry at home covers the setup.
The field labelled This is takes the product name, and the recording types “Emerald and Diamond Pendant”. That text tells the model what it is looking at, and it is why the emerald-cut stone and the double diamond halo survive into every later scene.
The category dropdown is set to Jewelry & Accessories. It determines which scene presets and which model poses appear further down, so a wrong setting means scrolling past poses built for handbags.
Step 2: choose a scene type and add one line of direction
The five scene types
The panel headed How should we show the product? offers five, each with a thumbnail:
| Scene type | What it produces | Where it goes on a listing |
|---|---|---|
| Plain background | Clean product on a neutral ground | Main image, marketplace compliant |
| Close-up | Detail, texture, materials | Second or third image, shows the setting |
| On a person | The piece worn, in use naturally | Shows scale and drape |
| Lifestyle scene | The piece in a natural setting | Gift and occasion framing |
| Infographics | Icon callouts on key features | Answers spec questions in the image |
Which of the five leads depends on where the listing sits. Amazon requires the main image to have a pure white background, which is what the plain-background scene produces. Etsy and Shopify set no such rule, so a lifestyle or on-model shot can take the first slot there and the plain-background version moves down the carousel.
The recording generates Plain background first. That is the image a marketplace will reject if the product is rendered wrong, so it is worth confirming the tool holds the piece accurately before spending credits on the other four. For the craft context behind each of these shot types, see our jewelry product photography guide.
The preferences box is the whole brief
Under the scene types is a free-text field. The recording types two words into it: reflective surface. That is the entire art direction, and it produces the soft mirrored reflection under the pendant in the result.
Below the field sit one-click prompt fragments: Cream Backdrop, Three-Quarter Front View, Soft Drop Shadow, Slight Pedestal Tilt, Museum Display Mount. Each one names something physical: a surface, an angle, a shadow, a tilt, a mount. That is the register the field is built for.
Step 3: put the pendant on a model without booking one
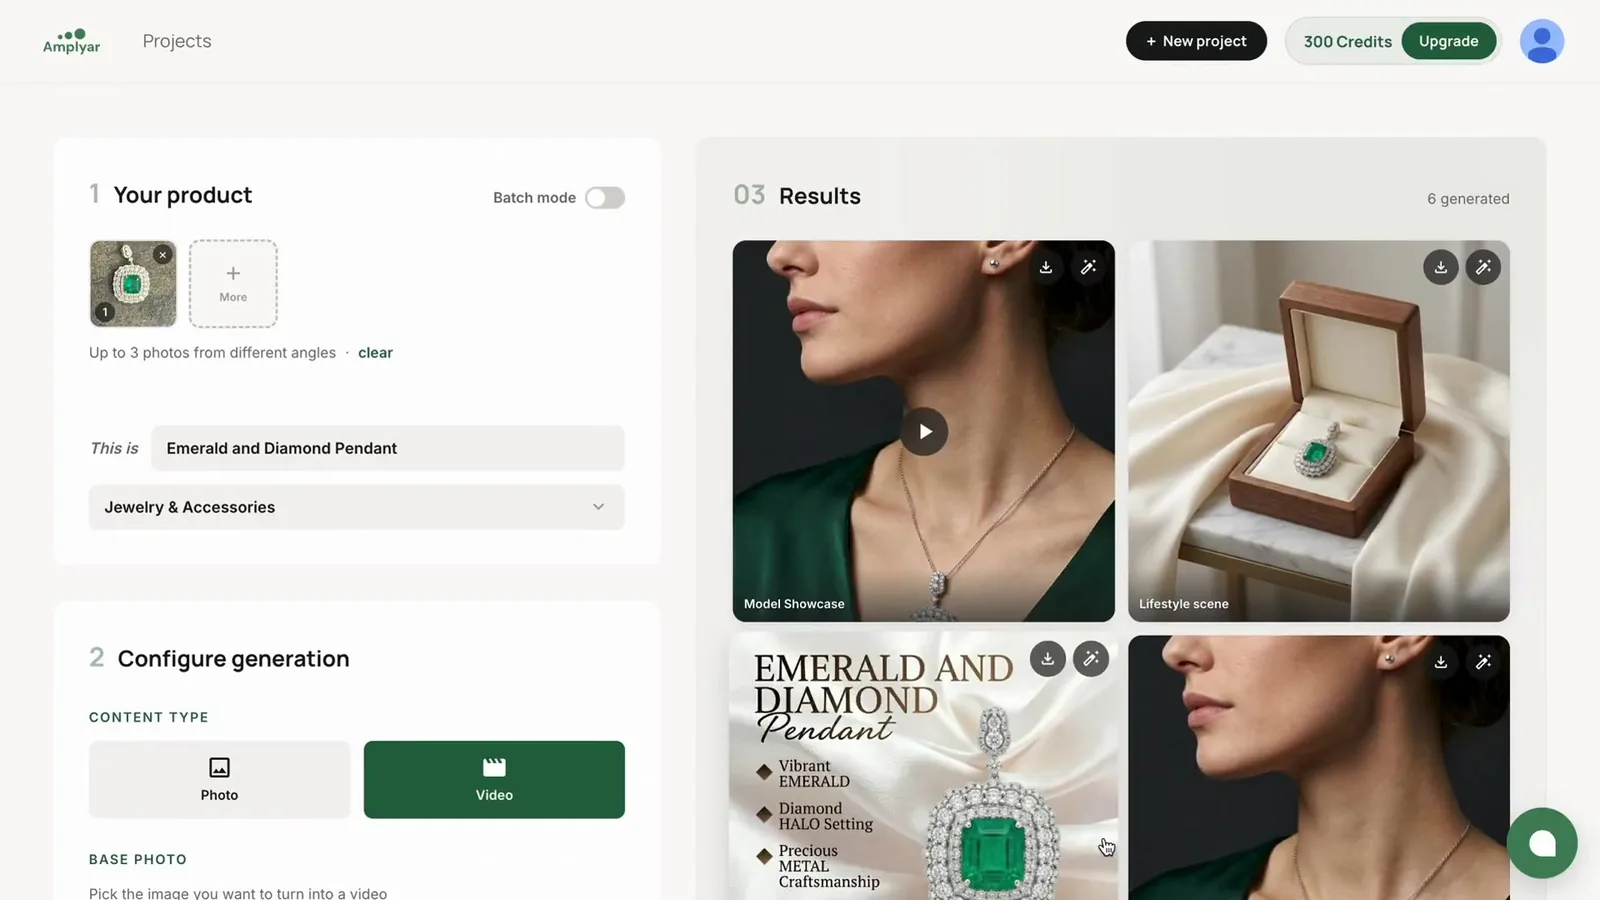
Switching to On a person opens a model picker. The carousel offers Auto, an upload slot for your own model, and named stock models: Olivia, Emma, Sarah, Maya, Ryan. The recording picks Maya. The prompt chips above it change to match the scene type: Neck Closeup, Formal Evening Wear, Pale Skin Tone, Soft Natural Daylight, Slight Downward Tilt.
A pose modal opens next, with a grid running from full-body framings down to the close crops that matter for jewelry: Wrist at Chest, Hand at Chin, Side Profile, Hand at Cheek, Ear Close-up, Hands Clasped, Neckline Close-up, Profile Close-up. The recording selects Neckline Close-up, which puts the stone at the centre of the crop and gives the chain a collarbone to establish scale against.
The model picker in the recording is Amplyar's ai jewelry model generator, and it is free to try on your own piece.
Advanced settings hold two more controls. Aspect ratio is set to 9:16, because this output is going to a vertical feed rather than a listing grid. The Style dropdown lists Photorealistic, Illustration, Cinematic and Editorial. Marketplace rules govern how accurately the product is shown rather than how the image was made, so the style choice belongs to the placement: Photorealistic for the listing, the others for ad creative.
Which crop suits which piece type, and what a conventional model shoot costs by line item, are covered in our guide to jewelry model photography.
Step 4: fix a result with one sentence instead of a reshoot
Clicking into a finished result opens a detail view with a Versions row, a download button, a Create Video button, and a text box labelled Improvements.
The recording types: Put one minimalist earring on the model. The button reads 1 Credit. V3 comes back with a small stud added, and the pendant, the model and the background are otherwise unchanged. Original, V1, V2 and V3 stay on tabs, so nothing is overwritten.
Because a correction costs 1 credit and the earlier versions survive, it is cheaper to generate and then fix than to specify everything in the first prompt. The edits that work in the recording each name a physical change: remove the shadow, darken the background, warm the light, add a stud. A request that changes the concept rather than a detail is better run as a new scene, which costs 2 credits.
Step 5: turn the finished still into a product video
Flipping Content Type to Video changes the input. Instead of the original photo, you pick a base photo from what has already been generated, and the recording uses the on-model shot.
Three motion templates are offered: 180 Degree Spin, Model Showcase and Detail Showcase. Model Showcase is selected. Duration options are 4, 6 or 8 seconds, and 6 is chosen. The Generate button reads 60 Credits against 2 for a still, and the counter drops from 360 to 300 when it completes.
At thirty times the price of a still, the video is worth generating last, from an image you have already accepted.
This article documents one tool's workflow and does not rank it against others. The scene types, model picker and video templates shown throughout are Amplyar's AI jewelry photo generator. The rest of the category sits in our jewelry and accessories photography guides.
Frequently asked questions
Not much. The input in this tutorial was an unedited phone photo of a pendant on a rough stone slab, with mixed daylight and visible grain. What matters is that the piece is fully in frame and in focus enough to read the setting. You can upload up to three angles.
The recording runs 104 seconds and covers the whole run, including scrolling and reading menus. Stills return fast enough to keep working, and the six-second video is the slow step. Allow a few minutes per product if you generate the full set rather than one image.
Yes. The improvements box takes a plain sentence, such as putting a minimalist earring on the model, and returns a new version for one credit. Earlier versions stay on tabs, so you can compare Original against V1, V2 and V3, and roll back.
Yes, provided the product itself is not altered. Both marketplaces police accuracy, not how the image was made. Generated backgrounds, models and lifestyle scenes are fine. Check every result for changed stone colour or a different setting before you publish it.
Daria Bazankova
Writes about e-commerce imagery and AI at Amplyar.
Keep reading
Facebook jewelry ads that work in 2026
10 min read · 27 Aug 2026
Best AI for Jewelry Photography in 2026: Six Tools Compared
14 min read · 24 Aug 2026
Jewelry model photography: how to get on-model shots without a model
9 min read · 13 Aug 2026